Showing posts with label Crafts. Show all posts

Tuesday, June 26, 2012

Easy Striped Canvas

This is another really easy wall decor project. I pulled these together in an hour or so.

You will need:
-Canvas(es)
-Acrylic paint in various colors
-Masking tape
-Ruler

I had an awesome 7-pack from Michaels. They have great sales there and always have 40% off coupons. I got lucky and mine was off anything, including sale items!  I also have a variety of acrylic paints and foam brushes to use.


Tape out your canvas. I did a couple diagonal stripes and one vertical. Use a rules to make sure your tape stripes are relatively evenly spaced. A little off won't matter though. *Make sure your tape is sealed on the edges against the canvas* Press over it a couples times.


Start painting. Let the paint dry between coats. I used 3 coats, but 2 would probably be okay.


Let the paint dry for 20-30 minutes after the last coat. Now you can take off the tape strips!


Voila! Now I also added a second color on each of these. Just tape them up again using the ruler and paint the second color. **Money saving tip- I reused the tape strips. The paint was dry by the time I pulled it up and it stuck just as well the second time!**


Here are the finished pieces hanging on our hallway. I love the color they add and they aren't over-powering!

Another I made for the 4th of July.. although it is still in the house and I feel good being patriotic!


Friday, December 23, 2011

Salt Dough Ornaments

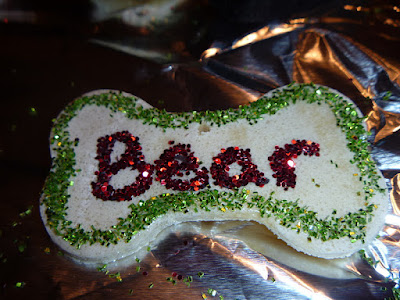
Made this recipe for Salt Dough Ornaments today. They are super easy and pretty cute, because they look like sugar cookies. I just wanted to share some photos of how mine turned out after I decorated them. We are going to try and spray-adhesive them tomorrow to keep the glitter attached and add the string/wire to hang them from Hope you like!


Wednesday, December 21, 2011

Paint Chip Artwork

So I have seen quite a few paint chip pieces of art out their. I had planned on making a replica of this, however my shapes weren't quite as well cut. Great job Two Girls Being Crafty! My mom had overseen and asked what I was doing with all the leaves and it sparked this piece of artwork! I am pretty proud because well I love to do art stuff, I am not as gifted as I would like. I hope this art can be your inspiration as the one I saw was for me!

You will need:

  • A canvas
  • Paint chips (or old book pages, scrapbook paper, anything really!)
  • Mod Podge
  • Foam brush (es)
  • Sharpie
  • Acrylic Paint (optional)
  • scissors
  • pencil
  • paper bag
*As I mentioned, this could be done with any paper medium, not just paint chips. I feel a bit guilty about taking so many, as I have heard they do cost the stores...Sorry! I really want to try this with book pages!

Lots of paint chips! I got ones that were larger pieces, not the ones broken up by white lines. I made a leave shaped template and traced that 4 times on about 40 chips!


They started out one size, but as I put them on the tree, I cut some of them down. 


I used a paper bag as the template for the tree, so I could sketch and erase ( a lot) as I went.


When you get the tree as you like, cut it out, carefully!


There he is finished! It would be an option to paint (or not) and glue this directly on the canvas. 

I traced the tree on the canvas with a thin-tip permanent marker, and filled it in with this as well. After, I put a coat of black Acrylic paint where I could get my fat brush to fit. The paint was more of a true black vs the blue-black of a marker. (ha I rhymed!)

There is my tree, ignore the wet paint/shiny spot!


Now you can start placing the leaves, without gluing first. This is when I cut some down and moved them around a lot to get the right color patterns etc.


Now it's time for the Mod Podge! I used a foam brush, but any paint brush would work also. Brush some on the bottom of each leaf and press them into place. Don't worry about the corners sticking up, we'll get to that.

Coat the ENTIRE canvas in a layer of Mod Podge. IT WILL DRY CLEAR, so don't be alarmed. However, be sure to try and coat it evenly and avoid bubbles. I learned this the hard way. 

Okay, here is where we deal with those pesky edges peeling up! Grab a sheet of plastic wrap, and if possible cover the entire canvas. Lay it down as smoothly as possible. Now place some books as heavy objects on top to press down the leaves. *If your canvas is like mine, you may way to place something underneath it to, so you down put too much weight on the canvas and tear it, if that is possible?*

Remove the objects and plastic wrap after 10-15 minutes and let the Mod Podge dry. Do another coat or two as you please, to even it out and get everything covered. It will dry clear and glossy.

Here is my finished product! I am excited to put it up in our new house and to try some more artwork with the Mod Podge. Hope this artwork inspires you to try some of your own! Don't be afraid and just have fun with it!


Tuesday, December 20, 2011

Wrapped Headphones

So I have seen a couple of these done of Pinterest, and decided I would do it myself. I lost a green pair of my headphones, and had to replace them with normal black ones. I wanted to spice them up a bit. The others I have seen use embroidery floss or yarn, but I found this Crochet thread and it is great!

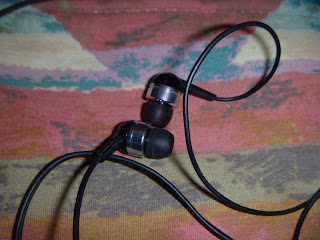
The boring headphones


Crochet Thread that I found at Hobby Lobby. Loved these colors, blue, grey purple-y! It isn't really thick, but it is strong enough.


You will need to knot the thread at the bottom of the cord. It will be wrapped in 3 sections, the main cord, the left and the right cords. I knotted it once, wrapped, tied and knotted it again to be sure.


I unrolled a large amount of the thread and wound it into a ball. For the method I am using to cover it, I need an ending point. You will see below. (Although I am sure you could do this method with the whole skein, this was easier)


From right to left, pull the thread over the cord, making a 'loop'. From the right working left, go under the cord and through the loop. You will pull this tight. It will make a tiny hump in the yarn. This is a friendship bracelet technique. 


It will take a couple of times around to see how the 'bump' in the thread can be controlled. Work in a slow, circular motion with the bumps in the thread.  You will knot off this section when done. Do the left and right cord sections the same as the first! It will be a long process, but it is easy to do watching tv or a movie, and the end result will be one of a kind!

Drop by after Christmas to see my finished headphones! =)


Wednesday, December 7, 2011

Homemade Play-dough!

Mixing it up again. I found an awesomely easy recipe for playdough! And the best part is that I could use Kool-aid to color it instead of food coloring! Smelling good and colored is pretty cool in my book! Great Christmas gift ideas for kids...

You need:
  • 1 cup flour
  • 1 cup water
  • 1/4 cup salt
  • 2 teaspoons cream of tartar
  • 1 tablespoon veg. oil
  • Food coloring or kool-aid packet(s)
**** EDIT: if using kool-aid, I would let it dissolve in the water and stir for a few minutes before adding to the mixture!
The line-up, minus the veg oil! Things you probably have in the cabinet!


(old pot, ignore the bottom) Add your flour...


Water...

Your choice of kool-aid, just happened to have this at home =)
** if using kool-aid, I would let it dissolve in the water and stir for a few minutes before adding to the mixture!

(love this photo) Add the salt...

The cream of tartar and veg. oil...


Stir together until mostly no lumps... Heat on medium and stir constantly.


The mixture will start to stick together and lose its liquid consistency.When it forms a ball together in the pot, remove.

It will be warm, and slightly sticky, but as you knead, it will form the playdough feel. And mine still smells slightly fruity! I am going to make a green or blue batch tomorrow =)
Enjoy!