Tuesday, December 20, 2011

Wrapped Headphones

So I have seen a couple of these done of Pinterest, and decided I would do it myself. I lost a green pair of my headphones, and had to replace them with normal black ones. I wanted to spice them up a bit. The others I have seen use embroidery floss or yarn, but I found this Crochet thread and it is great!

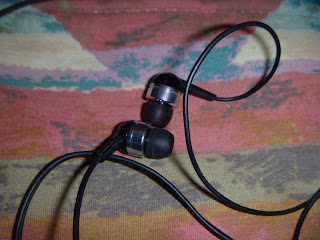
The boring headphones


Crochet Thread that I found at Hobby Lobby. Loved these colors, blue, grey purple-y! It isn't really thick, but it is strong enough.


You will need to knot the thread at the bottom of the cord. It will be wrapped in 3 sections, the main cord, the left and the right cords. I knotted it once, wrapped, tied and knotted it again to be sure.


I unrolled a large amount of the thread and wound it into a ball. For the method I am using to cover it, I need an ending point. You will see below. (Although I am sure you could do this method with the whole skein, this was easier)


From right to left, pull the thread over the cord, making a 'loop'. From the right working left, go under the cord and through the loop. You will pull this tight. It will make a tiny hump in the yarn. This is a friendship bracelet technique. 


It will take a couple of times around to see how the 'bump' in the thread can be controlled. Work in a slow, circular motion with the bumps in the thread.  You will knot off this section when done. Do the left and right cord sections the same as the first! It will be a long process, but it is easy to do watching tv or a movie, and the end result will be one of a kind!

Drop by after Christmas to see my finished headphones! =)


Peanut Butter Cups

So these were actually made before the Smores, but I was too excited about the latter to post yet! I actually made these last year too. My husband prefers them to actual Reeses Cups, which is amazing for me! You will need:


  • Chocolate (chips or bar)
  • Powdered Sugar
  • Peanut Butter
  • Cupcake liners


I used a mixture of Hershey's Milk Chocolate and Dark Chocolate chips. The Hershey's chocolate gives it the "reeses cup" taste.


Scoop out some peanut butter and microwave it for 20-45 seconds, depending on how much you use.


Add a small amount of powdered sugar to the PB and mix. Add a little at a time, until it is a thicker consistency. This is all up to the baker's preferences!


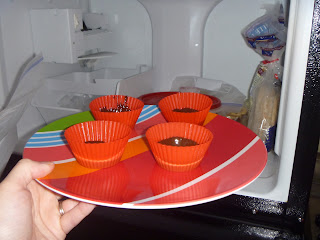
Melt the chocolate in the microwave for 30 seconds at a time, stirring in between. When it is melted, use a spoon to place inside the cupcake liner and turn the liner to spread the chocolate in a thin layer on the bottom and sides. Freeze for a couple minutes.


Using a spoon (baby spoons work great!) Spread a layer of PB over the bottom, thick as you like.


Cover again with chocolate and freeze for at least 5 minutes to get firm. Peel out from the liner when it is set.


They taste better than they look! Easy and delicious!


Tuesday, December 13, 2011

Smores Truffles

So I have wanted to make peanut butter cups again this year, but yesterday while doing that I came up with an even better idea...SMORES CUPS! I have silicone cupcake cups, and they are awesome to use for this! They peel right off the chocolate when I am ready to take them out.

Here's what you need:
  • graham crackers (I used Teddy Grahams)
  • Hershey's chocolate
  • marshmallow fluff
  • silicone/paper baking cups

I used a Teddy Grahams, because I don't eat regular grahams alone. I also mixed Hershey's milk and dark chocolate. I recommend at least the milk chocolate, because it gives it the signature Smores taste.


Melt the chocolate in the microwave or double boiler. I used a spoon to drop a little chocolate in the bottom of the cups. I turned and moved the cups around to the chocolate coated the bottom and a little up the side. It was super easy and looked nice with these silicone liners!


Freeze them cups with your first layer of chocolate for a few minutes.

I crushed up the grahams in a bag. You can also used chunks or make round cuts of graham crackers for the bottom.


I did this step both ways, you can put marshmallow down first and them the crumbs, or the opposite. I used a plastic bag the pipe in the marshmallow, because it is so sticky and thick, this is probably the easiest to get it coated. Cover again with a thin layer of chocolate. Freeze 3-5 minutes. 
*It is best to put marshmallow down first, then the graham crumbs, 
otherwise they drop out when you bite in!*

Peel back the liner from around the cups and voila! They are delicious and just like a real smores! I keep mine in the fridge, otherwise they could be a melty mess!


Hoping to try and make some concoction of smores balls in the next week or so! Enjoy!


Wednesday, December 7, 2011

Homemade Play-dough!

Mixing it up again. I found an awesomely easy recipe for playdough! And the best part is that I could use Kool-aid to color it instead of food coloring! Smelling good and colored is pretty cool in my book! Great Christmas gift ideas for kids...

You need:
  • 1 cup flour
  • 1 cup water
  • 1/4 cup salt
  • 2 teaspoons cream of tartar
  • 1 tablespoon veg. oil
  • Food coloring or kool-aid packet(s)
**** EDIT: if using kool-aid, I would let it dissolve in the water and stir for a few minutes before adding to the mixture!
The line-up, minus the veg oil! Things you probably have in the cabinet!


(old pot, ignore the bottom) Add your flour...


Water...

Your choice of kool-aid, just happened to have this at home =)
** if using kool-aid, I would let it dissolve in the water and stir for a few minutes before adding to the mixture!

(love this photo) Add the salt...

The cream of tartar and veg. oil...


Stir together until mostly no lumps... Heat on medium and stir constantly.


The mixture will start to stick together and lose its liquid consistency.When it forms a ball together in the pot, remove.

It will be warm, and slightly sticky, but as you knead, it will form the playdough feel. And mine still smells slightly fruity! I am going to make a green or blue batch tomorrow =)
Enjoy!

Thursday, December 1, 2011

Mom's Alfredo Sauce

For years I have been making this sauce, my husband loves it! But my mom has been making it for even longer! I haven't found another recipe that is quite the same as this! It is fattening I am sure, but SO Delicious! The original recipe calls for Heavy cream I believe, but we switched it for Half & Half in an attempt to make it a little healthier! I believe it is for just 8oz of pasta.

  • 1/2 cup (1stick) butter
  • 1 - 1 1/2 cups Parm. Cheese
  • 1 cup half & half
  • 1/4 tbsp parsley (I use more like 1/2 tbsp)
  • 12-16 oz pasta


Melt your butter in a small saucepan. (My sister recommends adding in a little fresh garlic or garlic powder)
After the butter is completely melted, add the half & half and the cheese. I usually start with 1 cup and let it heat a bit, then add the other 1/2 cup. (Of course I use all the cheese called for! ) Heat on low until the sauce begins to thicken. Stir occasionally. Right before saucing pasta, add in the parsley flakes. Salt & pepper to your liking.

We've made this sauce for lots of fun pasta dishes including fettuccine with sausage and sausage stuffed shells with this sauce! =)  (Pardon the photos, they were from my phone)


Enjoy!


Homemade Ice Cream: Strawberry Chocolate Chip

I can't believe I haven't posted a recipe yet for this delicious homemade ice cream. May I also point out, it is no-cook and does NOT require an ice cream machine! The recipe I first made was from Kevin & Amanda, but I have tweaked this one to my liking!

  • 2 cups Heavy Cream (1 pint /16oz) 
  • 1 can (14oz) Sweetened Condensed Milk
  • Milk
  • Chocolate chips
  • Strawberry Ice Cream topping
-Your line-up, minus the milk!


-Yes, we are using a fork. Anyways, in a chilled bowl, whip your heavy cream with a whisk or in a mixer. If by hand, don't worry about getting it to stiff peaks. A few minutes of whipping will do good.

-Pour your SCM (sweetened condensed milk) and 3/4 the jar of strawberry topping, and about 1/4 cup milk in a separate bowl. Combine the two. Add the whipped cream and combine well. This step differs from what K&A say. If the SCM and cream are not combined well, they will freeze separately! Add chocolate chips to your liking and mix. Feel free to taste it now and see if more milk needs to be added, depending on how sweet you want it.

This needs to be frozen for 4-6 hours, or overnight. I prefer to freeze overnight for it to be completely frozen and ice cream like. 


This basic recipe can be made with all different add-ins. We have made smores with marshmallow creme and chocolate chips, reese cup, snickers, and of course vanilla with a bit of vanilla extract and I like to add a little marshmallow creme for the flavor!

Have fun with this ridiculously easy and delicious ice cream recipe!


CRAFT: Paper Christmas Tree

Since the name is called MIX IT UP, I figured it would be okay if I threw a few crafts in the mix. So here is a pretty and easy paper tree I made a couple weeks ago!


  • Styrofoam/floral foam cone in the size of your choice
  • Flat head pins or decorative straight pins
  • 1 inch by 6in strips of paper (length can vary)
  • black/neutral sheet of paper
  • ornament 
  • Scissors or cutter


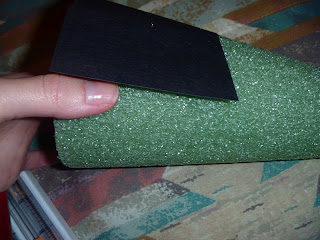
Start off with your foam cone:


I covered the bottom portion with black paper, because part of the bottom showed, and I didn't like how the foam looked. I used plain straight sewing pins.


Use a cutter (or scissors) to get your straight pieces for the branches. My paper was already 4.5 x 6.5 inches, so I just cut them in strips 1 in wide, 6.5 inches long.


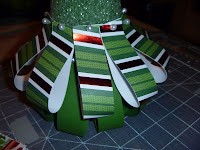
You'll need to bring the bottom edge of the strip to the top, DO NOT CREASE/FOLD, and pin them this way onto the cone. The first row should be placed so it barely touches the ground or bottom of the cone. I used these pins left over from our wedding flowers because they looked nice showing on the tree!


Keep going all the way around the cone for the first row. Keep them at the height, or close.


Repeat these steps again for each new row. Overlap the rows, starting each new row about an inch above the previous. As you go up higher, you can space the rows more if you like.


Here is one finished tree. Mine was made with more fun/whimsical patterns.


Here is the finished tree I made for my mom. Her's was more basic green/red prints. The stars were attached to a stick/wire and we found them at Michaels. They worked perfectly to stick through the middle of the cone and hide the bare top! I also placed a circle of the black paper on top to hide the foam.

These are super easy and can be made in various sizes! I hope you try one out for your holiday decor! <3