Monday, July 30, 2012

DIY Window Valence (Cornice)


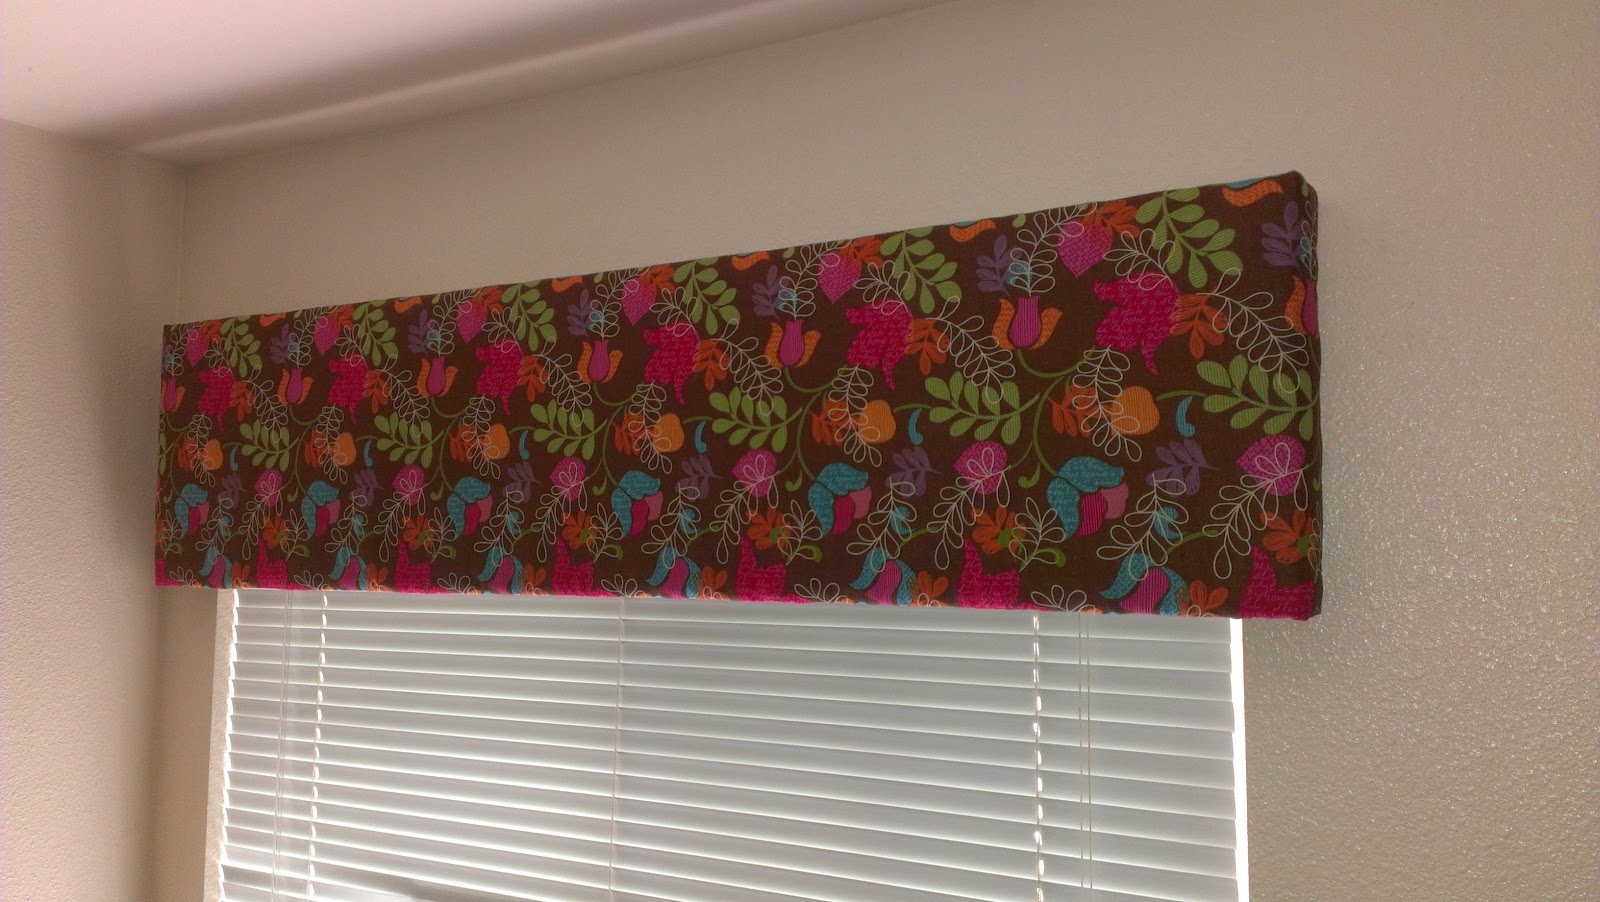
I am starting off with a photo of the finished product. You might be surprised to know what it is actually made from. In My Own Style made one similar and had a written tutorial I tried to follow for mine, but without photos, I did my own thing. Hoping this tutorial will help you!

This project started off with wardrobe boxes (Thanks Jerri Ann for the boxes!) Anything smaller wouldn't have worked for our windows.

I used a tape measure and yard stick to mark the box. For our spare bedroom windows (all my base friends listen up..) it was 50 inches long, with 2 inches on each end of the corner folds, so 54 inches total. I made mine 12 inches tall. The edges can be a bit hard to fold accurately. I used the closed blade of scissors to bend the cardboard over for an accurate fold. (See finished product if you are confused on the 'fold')


You will need batting to go under the fabric. I got this roll of 45in x 60in from JoAnns. Lay the batting under the valence piece and trim off the excess. You only need about 1/4 inch of extra batting along the egdes. 

I used Clear Tacky Glue to attach the batting. Just a thing layer is okay. Modge Podge might work also. It doesn't need to be attached tightly, because the fabric layer on top will be attaching both pieces on. Let this batting layer dry.

Cut your fabric the same way you did the batting, but with about and inch (or more if you want) extra on all sides. I wish I had left more fabric around the edges. Iron the fabric you cut.


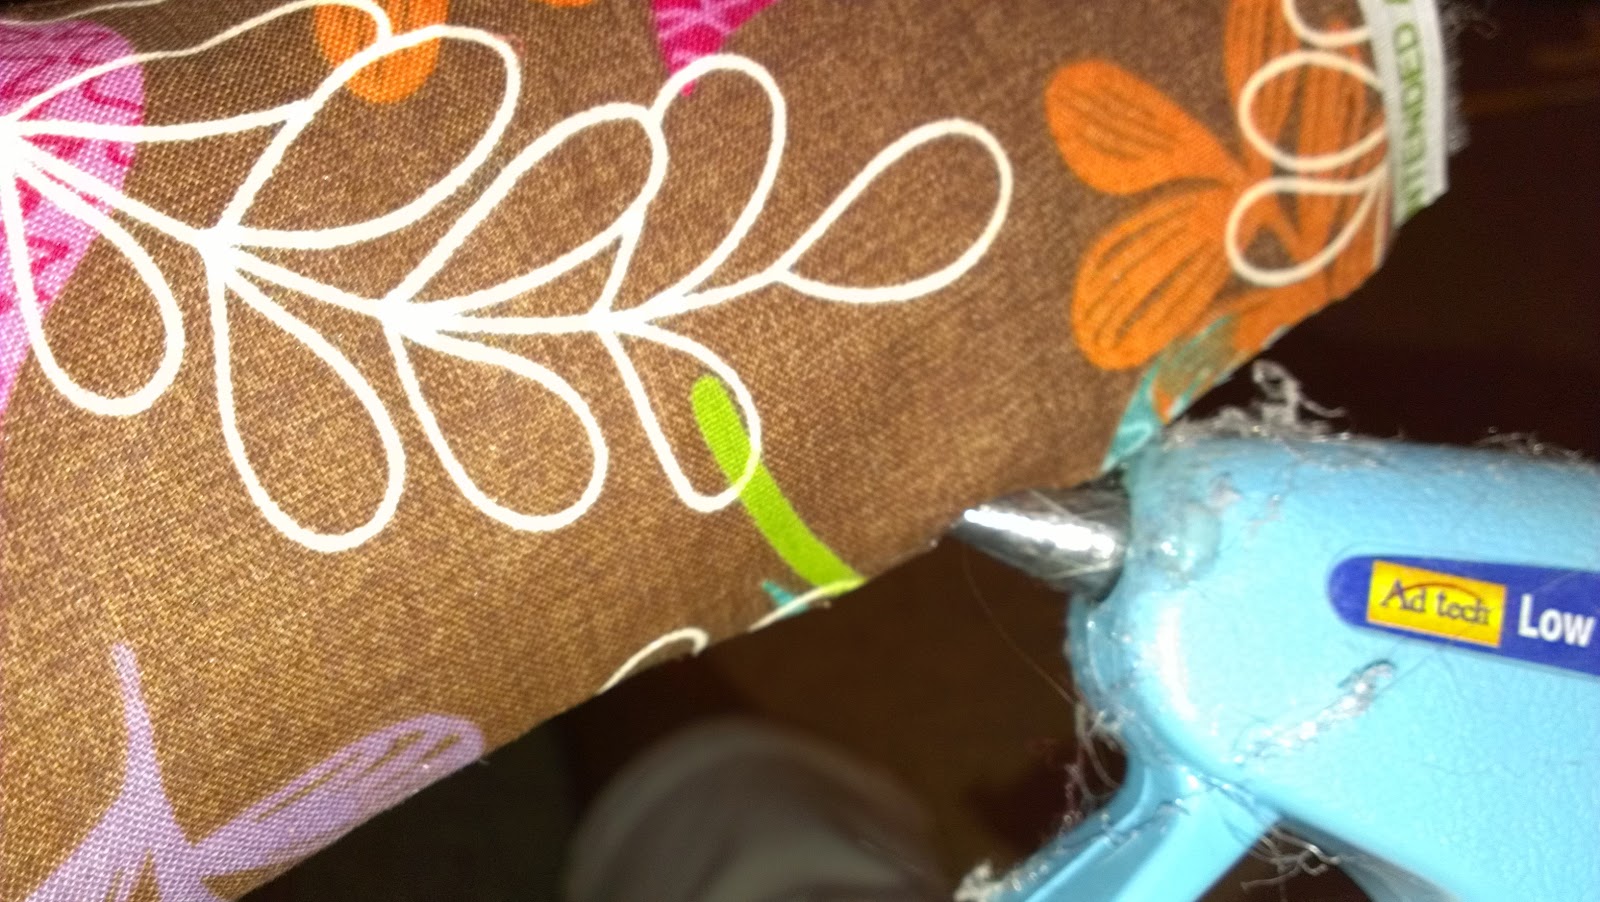
Now you are going to line up the fabric on top of the batting. This is where it was a little tricky, because there isn't an easy way to pin the fabric to the cardboard. Hot glue both edges and then it will stay put better to glue around the outside. When gluing, stretch the fabric around the edge and glue it into the back side. Do this all the way around.


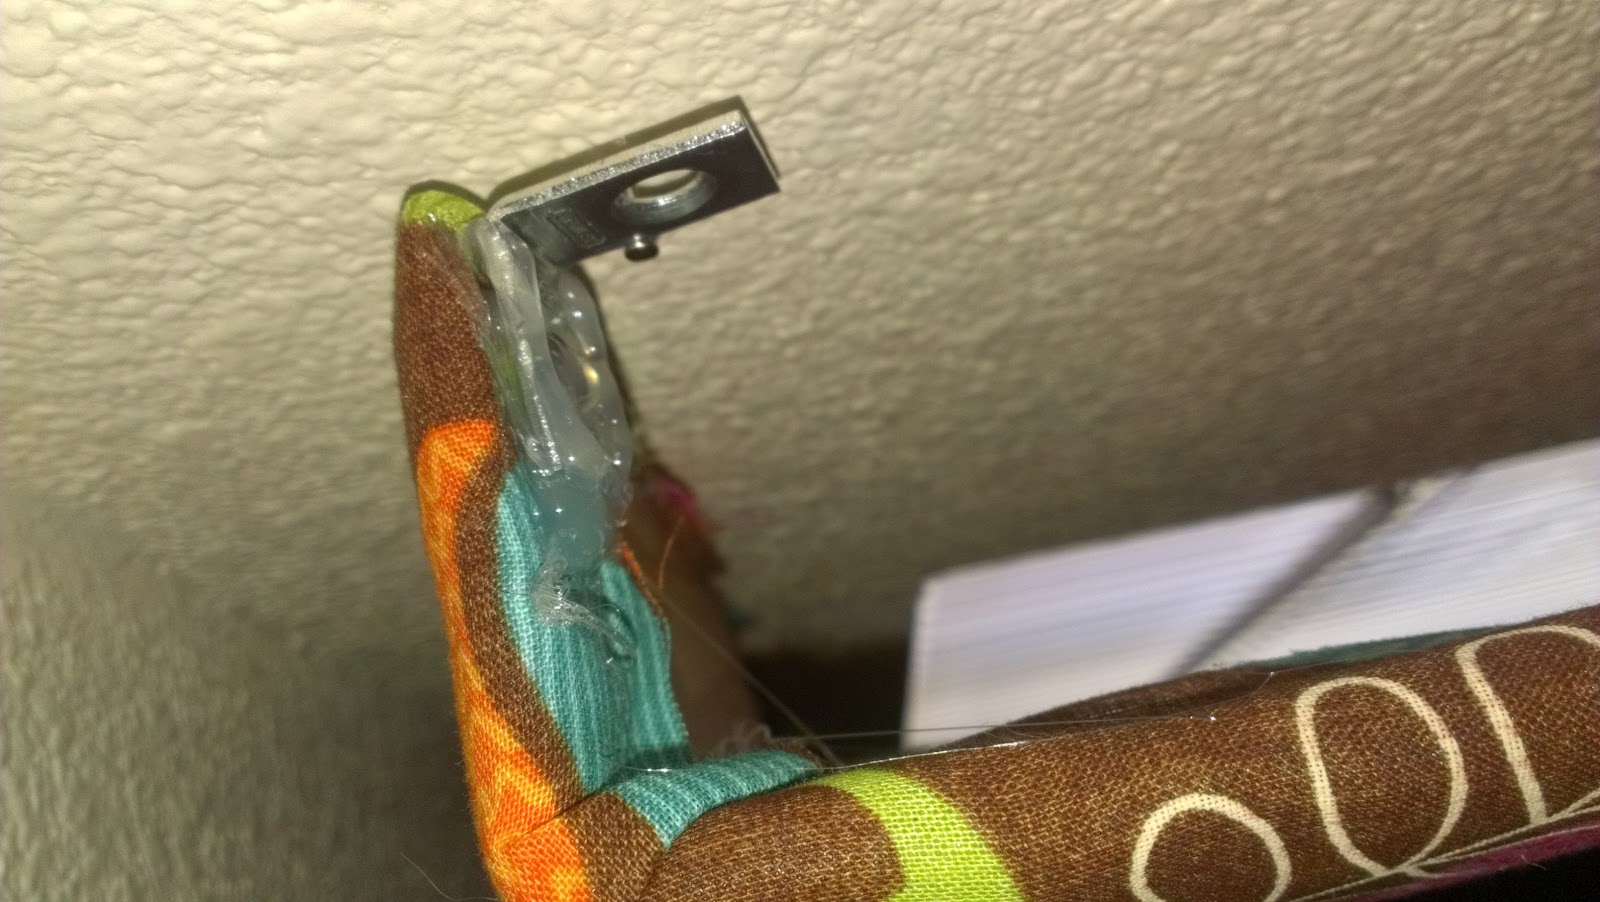
The hanging was easier than I thought. It helps to have two people because the window is almost too wide to hold a tape measure on both sides and make the marks.  You will use L brackets to hang it. Decide which side you want to be the top and attach the brackets to the valence. (1 on each top corner) The easiet way was to just hot glue them to the valence. 

The nails need to be measured apart so the brackets can hang on the nails.

I love the finished product! David hates that I use cardboard to decorate, but I read once "What cannot be seen, can be easily faked". I COMPLETELY agree. If it looks good and serves its purpose, then I don't care what I made it out of! I am being resourceful and recycling! :)

Hope this helps! Feel free to comment with any questions!


Sunday, July 29, 2012

Granola Bars

I made these about a month ago and keep forgetting to share the recipe. I found it online, through Pinterest I am sure. But I don't remember exactly where. Here is the basic recipe:


Start with your butter. It is one stick. It needs to be softened or melted.


Add the honey, brown sugar, vanilla and peanut butter.


Combine the oats, baking soda and flour in a bowl. Then add the mixture to the wet ingredients. Combine well! At this point you can add any extras. I used peanuts and chocolate chips. Dried fruit or other cereal would also be good.

mmm

Grease the pan with crisco or Miracle No Stick! (I used a large jelly roll pan) Pour the mixture out and use wax paper to squash it way down. Sorry for the blurry photo. Hubby was helping. You need to press it down well or they will crumble after baking.


Bake for 10-12 minutes or until golden brown on the edges ( ^this is before baking)
Let them cool in the pan and then cut into whatever pieces you desire! These also freeze well, if they last that long! Enjoy!


Miracle No Stick

Another Pinterest find, but every baker needs to have some of this in their cupboards!

I use my magic bullet to whip it up, but you could probably use a whisk and do it by hand or use a mixer.

It is all equal parts... Vegetable Oil, Crisco, and Flour. Whip Whip Whip until it is smooth!

You can use this on anything. It works wonder in muffin tins! Use a pastry brush or even just a paper towel to brush it on! Bake and release! :)

'Pot Roast' Crock Pot Chicken

So my crock pot is one of my favorite kitchen tools. I can cut up veggies and meat before work and throw them all in the pot. They cook and get yummy while I am working and are ready just in time for dinner. Going into work at noon has its advantages! (sorry for no photos. Didn't know if it would turn out)

Anyways, I had the veggies and seasonings to make pot roast in the CP, however the roast looked a little sketchy to me. It had been in the fridge a little longer than usual. So I decided to hold off until the Hubby could help me out.

At this time I already had the potatoes and onions cut and ready to go. So I grabbed a couple of frozen BLSL chicken breasts and used them instead of the roast. And this recipe is really easy to make in smaller portions. Just use less of all the ingred. and it will still be great!

You Will Need:

  • 2-4 Boneless, skinless Chicken Breasts
  • One can condensed French Onion Soup
  • 1 envelope pot roast seasoning (or similar choice)
  • Carrots
  • Potatoes (2-6 depending)
  • 1/2 to 1 onion
  • water
In a small bowl, mix the soup, seasoning and a little water. If you are making this for two, you can use half the soup/seasoning. Cut the potatoes, onions and carrots into small 'uniform' sizes so they all cook the same. Place the veggies in the bottom of the crock pot. (I RECOMMEND Crock Pot Liners.. they are a big time saver). Grab your chicken from the FREEZER and place over the veggies. Cover the whole mixture with the soup/seasoning mixture. Set your timer for 6-8 hours and put your crock pot on LOW. Everything is generally ready by 6 hours, unless you have large chunks of meat. I usually do 7 hours because of the time frame when I get off work.

This was great! I love the flavor of beef stew and the chicken was delicious and fall apart. And I even used the sauce to make a gravy! I can finally make a roux and simple gravy and I am pretty proud! Hope you will give this a try!

Tuesday, June 26, 2012

Easy Striped Canvas

This is another really easy wall decor project. I pulled these together in an hour or so.

You will need:
-Canvas(es)
-Acrylic paint in various colors
-Masking tape
-Ruler

I had an awesome 7-pack from Michaels. They have great sales there and always have 40% off coupons. I got lucky and mine was off anything, including sale items!  I also have a variety of acrylic paints and foam brushes to use.


Tape out your canvas. I did a couple diagonal stripes and one vertical. Use a rules to make sure your tape stripes are relatively evenly spaced. A little off won't matter though. *Make sure your tape is sealed on the edges against the canvas* Press over it a couples times.


Start painting. Let the paint dry between coats. I used 3 coats, but 2 would probably be okay.


Let the paint dry for 20-30 minutes after the last coat. Now you can take off the tape strips!


Voila! Now I also added a second color on each of these. Just tape them up again using the ruler and paint the second color. **Money saving tip- I reused the tape strips. The paint was dry by the time I pulled it up and it stuck just as well the second time!**


Here are the finished pieces hanging on our hallway. I love the color they add and they aren't over-powering!

Another I made for the 4th of July.. although it is still in the house and I feel good being patriotic!


Sunday, May 27, 2012

Fabric Wall Decor

I am pretty proud about this new project I whipped up today! I've vaguely seen it around Pinterest, but this is one thing I actually tackled without checking out somebody else's tutorial! :)  I was wandering around JoAnn's Fabric today. They were having a Memorial Day sale, including a Military discount! (oh yeah!) So I knew I had to walk out with some project to do. I spent a long time picking out colors and patterns so I hope my husband approves!

You will need:

  • Fabric of your choice
  • White fabric
  • Embroidery Hoops (varying sizes) 
  • Hot glue gun
  • Scissors
  • Iron
  • Spray Paint (optional)

Here is the lineup. I choose 3 out of 4 of my fabric choices from the small pre-cut rectangles at joanns. And all I had was chalkboard paint, but I just really needed black.


Spray the outer rings of the hoops. (You could always leave them alone, but all the wood in our living room is dark so..)

 
You will need to iron the fabric. Take your time and use a spray bottle to make it easier.


I put white in the each hoop first so it wasn't see through. Only attach to the center hoop. I stretched it and hot glued it onto the rim. Make sure you are pulling it tight and evenly.


Cut off the excess fabric after it has been glued around.


Cover the remaining inner rings with the white fabric. After the hoops have dried you are ready to assemble them.

Place the fabric over the inner ring and attach the outer ring the hold it in place. Pull the fabric tight around it.

Flip it over and cut off the excess. Leave a little edge to glue down around the inner ring.
Repeat with the other hoops.


& VOILA! I love how the black looks and it matched our living room furniture. Now I have to find a spot to hang them! Will post a photo when they are up later!

This project has so many possibilities and it is super cheap! The hoops were $1.50 each, the fabric squares were $1.50 and I already had the hot glue and the spray paint. I think it ended up being about $10-$12 dollars! And they will hang on straight pins I think! :)


FINALLY GOT THEM ON THE WALL THIS MONTH:

Strawberry Lemonade Bars

I went to the Carlsbad Farmers Market yesterday with a friend. I hadn't been to one around here and it was a great place to find all kinds of fruits, veggies, and homemade products. Anyways, we left with lots of strawberries and I had a fridge full of lemons. I found this recipe and decided to give it a go!


Start by mixing the butter, sugar, flour and salt to make the crust dough. I used melted butter to make it easier. Press it down in the bottom of a greased 9x13 pan. (I greased with this fabulous secret). Bake for 16-18 minutes at 350 degrees.

 
Cut your strawberries to puree them. I took off most the the skin/seeds because I didn't have a way to strain the puree. Add the puree to the lemon juice and zest.


Add the eggs and remaining ingredients to the fruit. Mix well. I used the 'whip' attachment for my mixer.


Pour the filling onto the warm crust and bake another 23-25 minutes. The filling will the set when it is done.

Let cool completely before cutting into them. Refrigerate. I recommend serving them cold.


Mm, they are tangy, but still sweet! Definitely refreshing for a hot day!

Good job K&K test kitchens! Love the recipe!